NODE.JS 란?
node.js 다운로드 : node.js 다운로드 검색 -> v20.12.0(LTS) 다운로드
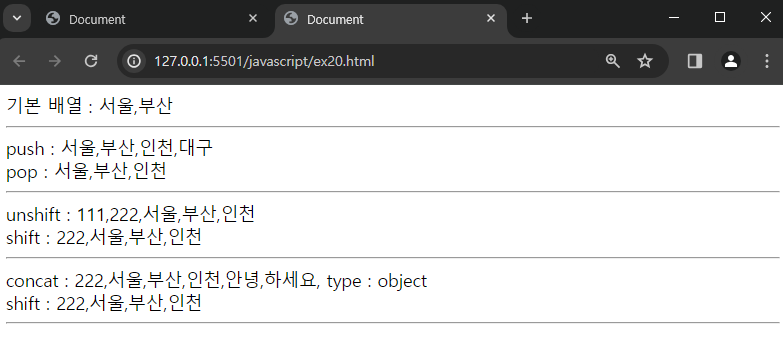
jason : 키와 밸류 형태의 문자 기반의 표준 포멧(소규모)

HTTP, IP
https : 암호화 기능이 있다
web browser : 번역기 역할
ip : pc를 찾아가기 위한 유일한 번호
port : ip를 통해 찾아간 후 어느 주소로 가야할지 표현해주는 방식
DNS : 숫자로 된 ip주소를 문자로 변환
SERVER & CLIENT, 웹 서비스
server : 서비스 제공 하는 컴퓨터
client : 서비스 제공 받는 컴퓨터
정적 웹서비스 : HTML, CSS, javascript
동적 웹서비스 : Node.js

NODE.JS 기능 (1)
require : import역할 (외부 파일을 끌어다 쓰는 역할)
.createServer(req, res) : 서버 생성, 변수에 request, response
request : 사용자가 서버에게 요청
response : 서버가 사용자에게 응답
.listen(포트번호) : 해당하는 포트번호에 서버를 실행 시키고 대기하는 상태
* 서버 연동(구동) 방법 : TERMINAL창에 node main 입력하면, 생성한 프로젝트인 main.js를 구동시킨다
.writeHead(200, {"Content-Type" : "text/html; charset=utf-8"}) : 200 = 성공적으로 연결, html형식으로 전송, 인코딩 = utf-8
.end() : 클라이언트에게 보여줄 내용 전달
const http = require("http");

const app = http.createServer((req, res) => {
  console.log("연결 성공!!!");
  res.writeHead(200, { "Content-Type": "text/html; charset=utf-8" });
  res.end("연결 성공 되었습니다!!!!");
});
app.listen(3000, "192.168.42.100");
실행 결과


NODE.JS supervisor
* npm install supervisor --save : 코드를 수정하였을 때 바로 구동되도록 하는 역할을 하는 패키지 설치
supervisor 실행 방법 : TERMINAL창에 npx supervisor main 입력
NODE.JS express
require("fs") : 파일을 불러오겠다
다양한 기능을 제공하는 프레임워크(express) 설치 : npm install express@latest --save (@latest = 최신버전 or @버전명)
express명.get(url, (request, response)함수) : 해당하는 url에 접속했을 때
response.send() : 클라이언트에게 보여줄 내용 전달
const express = require("express");
const app = express();

app.get("/", (req, res) => {
  res.send("기본 페이지");
});
app.get("/test", (req, res) => {
  res.send("테스트 페이지");
});

app.listen(3000, () => {
  console.log("3000port 서버 구동");
});
실행 결과
NODE.JS ejs (1)
ejs 설치 방법 : npm install ejs -s
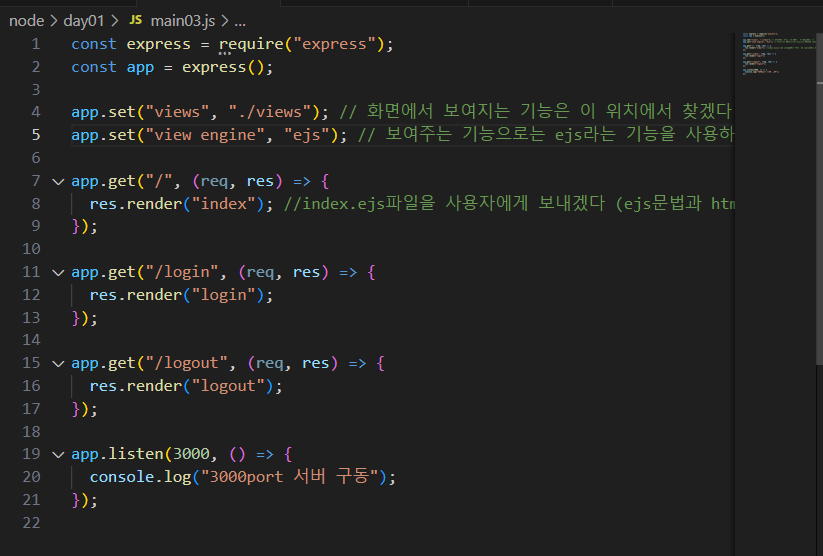
express명.set("views", "./"); : 화면에서 보여지는 기능은 지정한 위치에서 찾겠다
express명.set("view engine", "ejs"); : 보여주는 기능으로는 ejs라는 기능을 사용하겠다
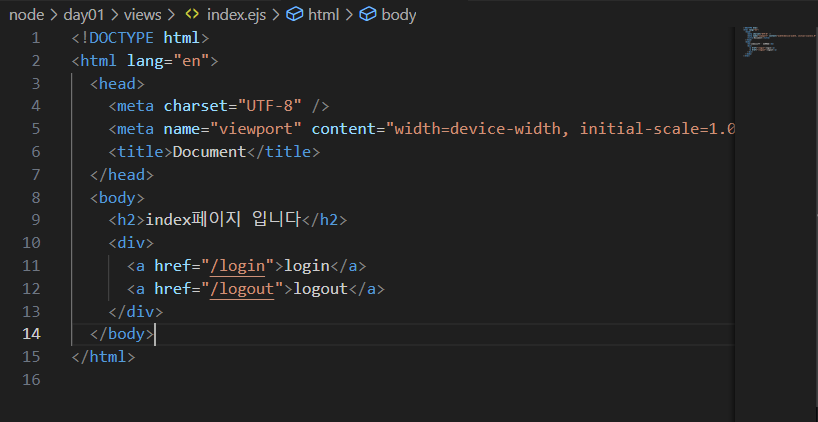
response.render(파일명) : 해당하는 파일을 사용자에게 보내겠다(ejs와 html문법을 섞어서 사용 가능)
실행 결과
NODE.JS ejs (2)
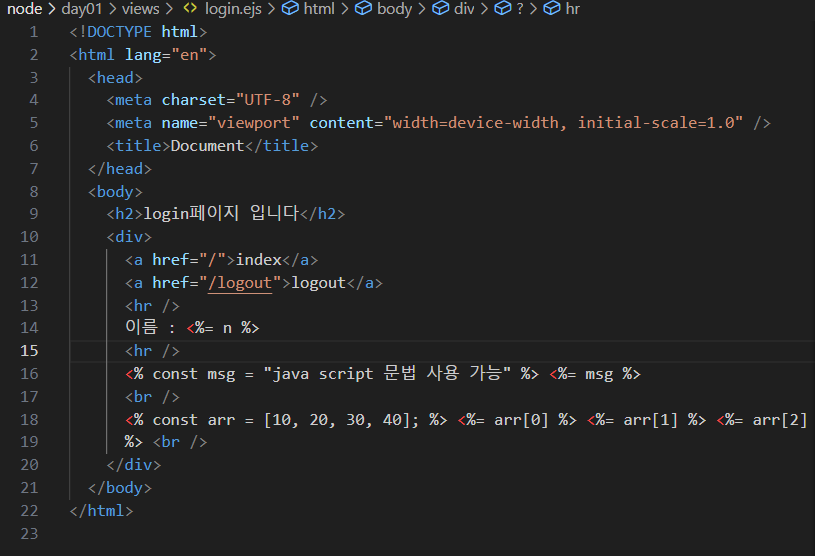
response.rende("파일명", {key : value}) : 해당 파일에 키와 밸류 형식으로 값을 전달
<%= 변수 %> : 해당한는 값을 출력 할 때 사용
<% 내용 %> : 연산 등을 할 때 사용
* 서버에서 먼저 번역한 후 클라이언트에게 보내주는 순서!
const express = require("express");
const app = express();
app.set("views", "./views");
app.set("view engine", "ejs");
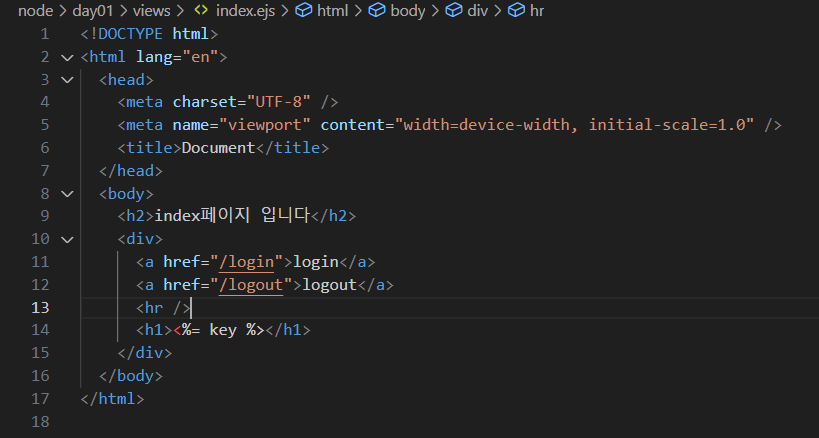
app.get("/", (req, res) => {
res.render("index", { key: "value" });
});
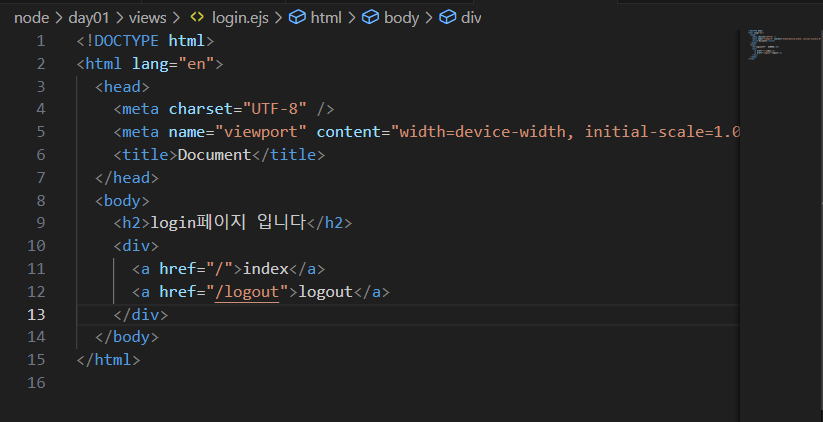
app.get("/login", (req, res) => {
const name = "홍길동";
res.render("login", { n: name });
});
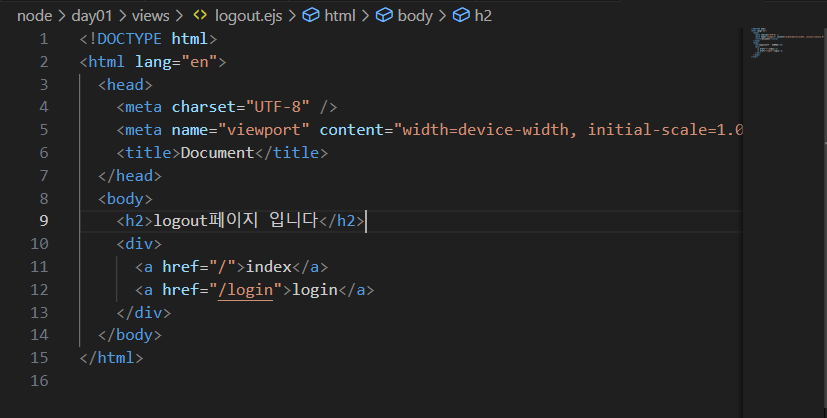
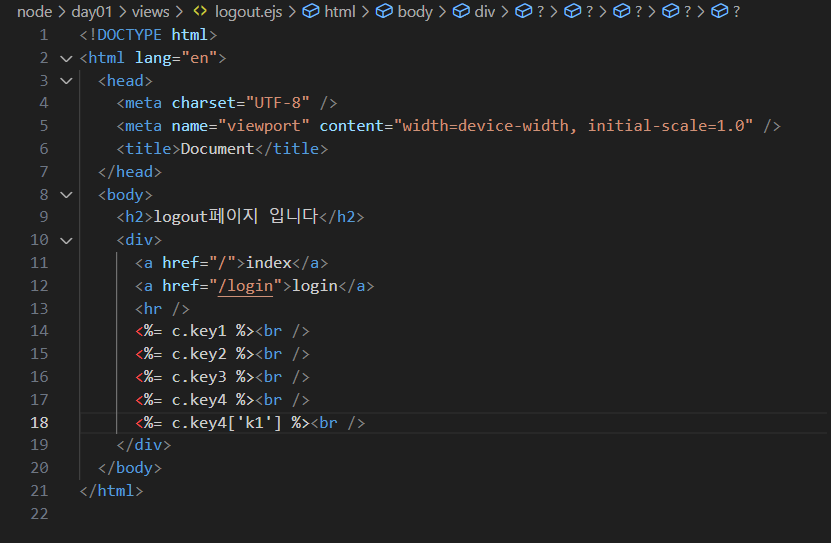
app.get("/logout", (req, res) => {
const context = {
key1: "값1",
key2: "값2",
key3: [10, 20, 30],
key4: { k1: "k11", k2: "k22" },
};
res.render("logout", { c: context });
});
app.listen(3000, () => {
console.log("3000port 서버 구동");
});
실행 결과
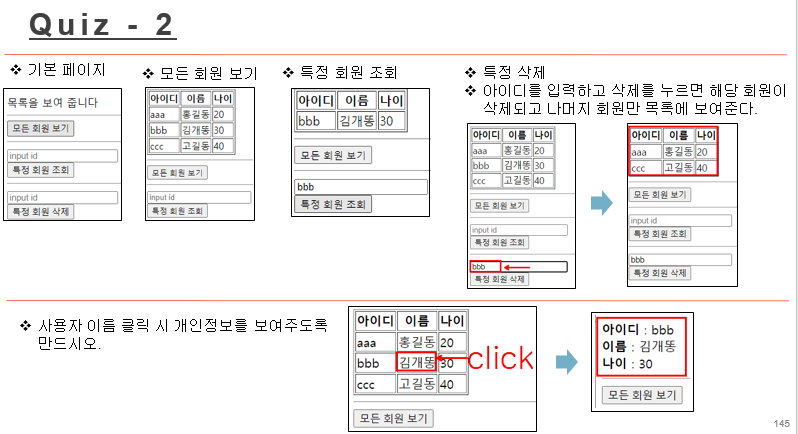
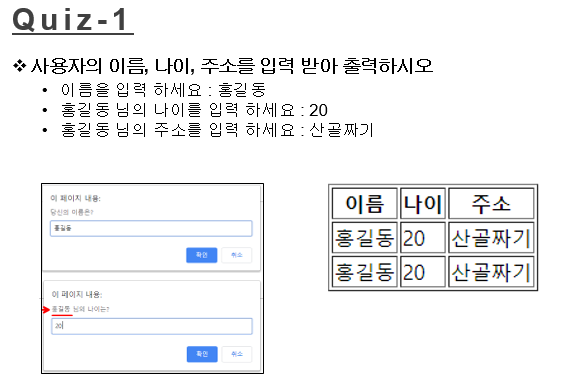
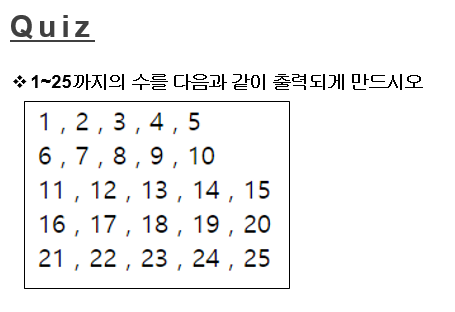
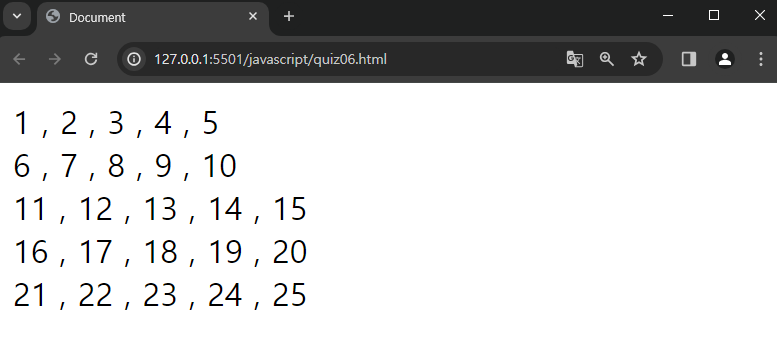
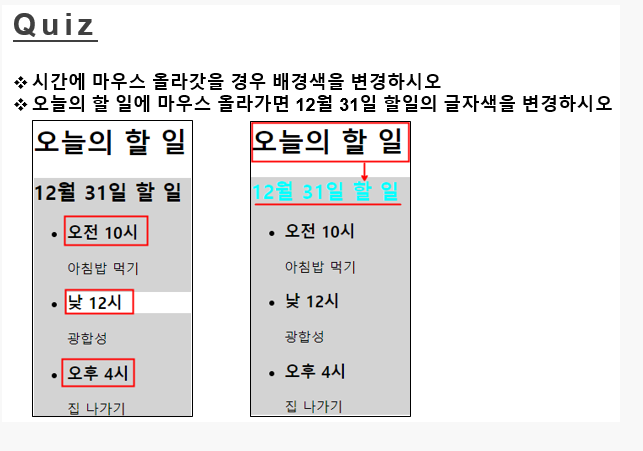
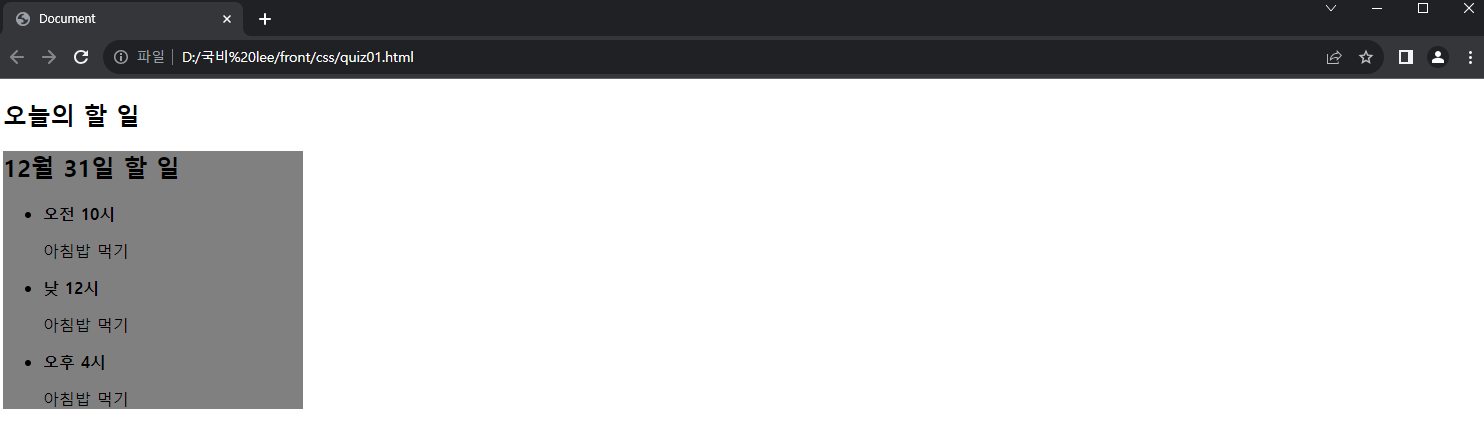
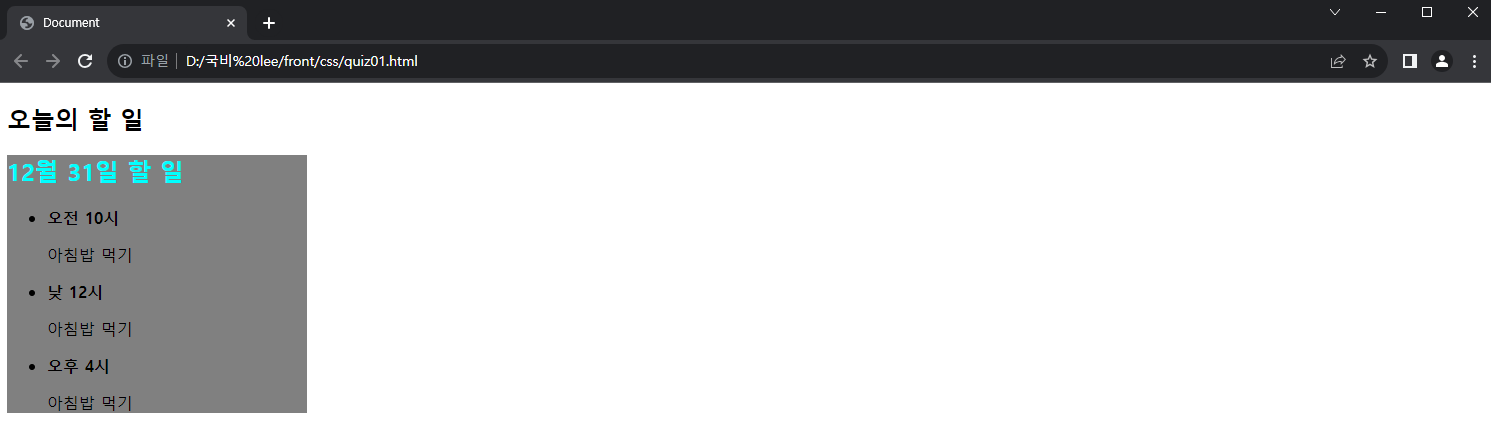
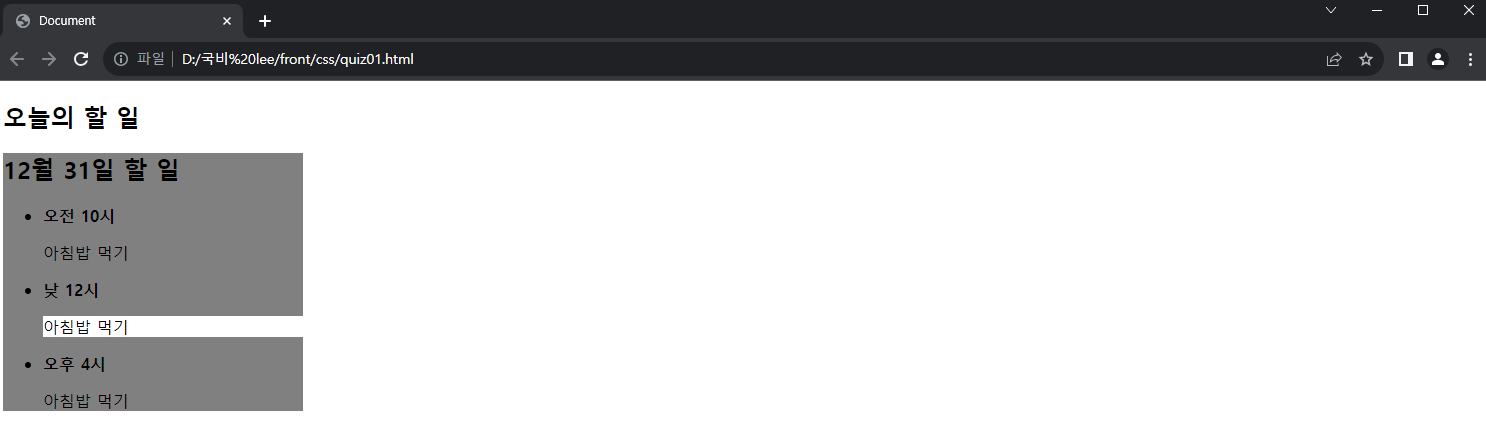
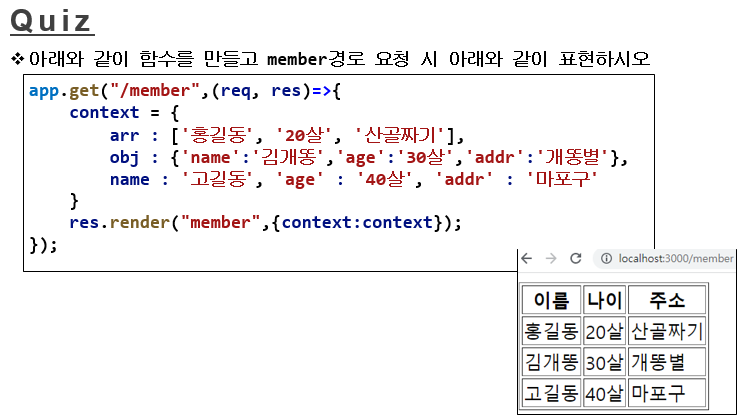
Quiz 01
풀이 과정 (1)
const express = require("express");
const app = express();
app.set("views", "./views");
app.set("view engine", "ejs");
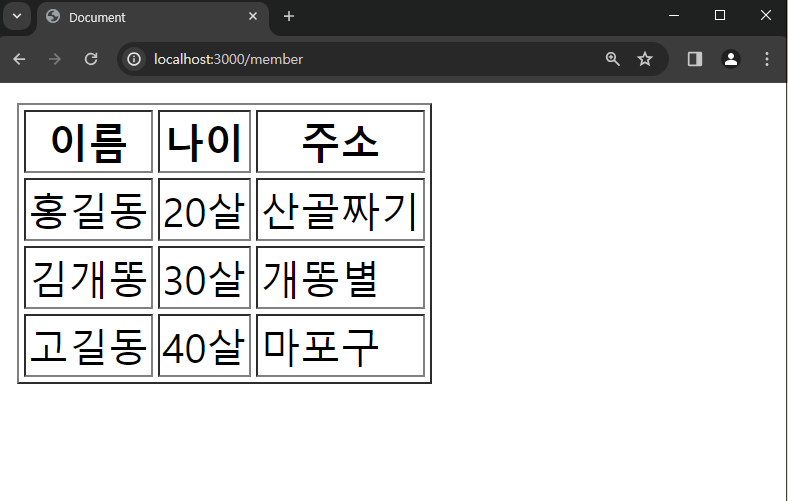
app.get("/member", (req, res) => {
context = {
arr: ["홍길동", "20살", "산골짜기"],
obj: { name: "김개똥", age: "30살", addr: "개똥별" },
name: "고길동",
age: "40살",
addr: "마포구",
};
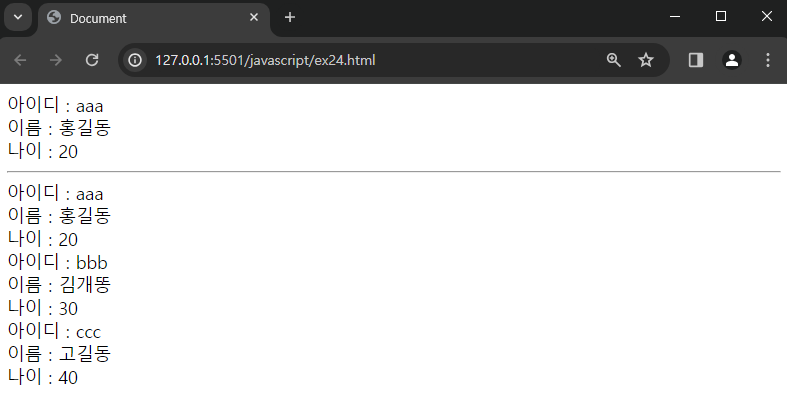
res.render("member", { context: context });
});
app.listen(3000, () => {});
풀이 과정 (2)
<!DOCTYPE html>
<html lang="en">
  <head>
    <meta charset="UTF-8" />
    <meta name="viewport" content="width=device-width, initial-scale=1.0" />
    <title>Document</title>
  </head>
  <body>
    <table border="1">
      <tr>
        <th>이름</th>
        <th>나이</th>
        <th>주소</th>
      </tr>
      <tr>
        <td><%= context.arr[0] %></td>
        <td><%= context.arr[1] %></td>
        <td><%= context.arr[2] %></td>
      </tr>
      <tr>
        <td><%= context.obj["name"] %></td>
        <td><%= context.obj["age"] %></td>
        <td><%= context.obj["addr"] %></td>
      </tr>
      <tr>
        <td><%= context.name %></td>
        <td><%= context.age %></td>
        <td><%= context.addr %></td>
      </tr>
    </table>
  </body>
</html>
실행 결과
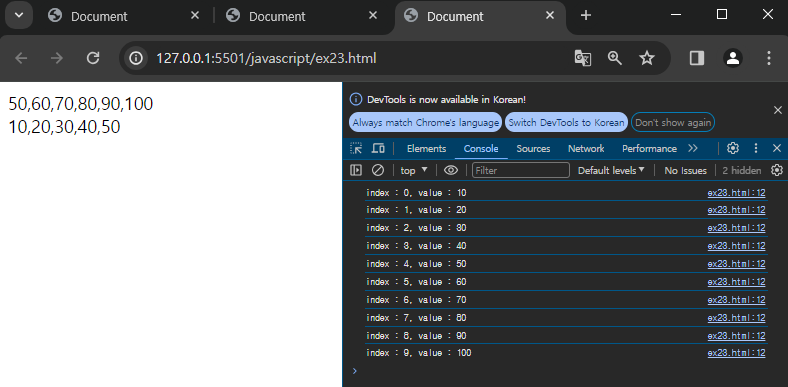
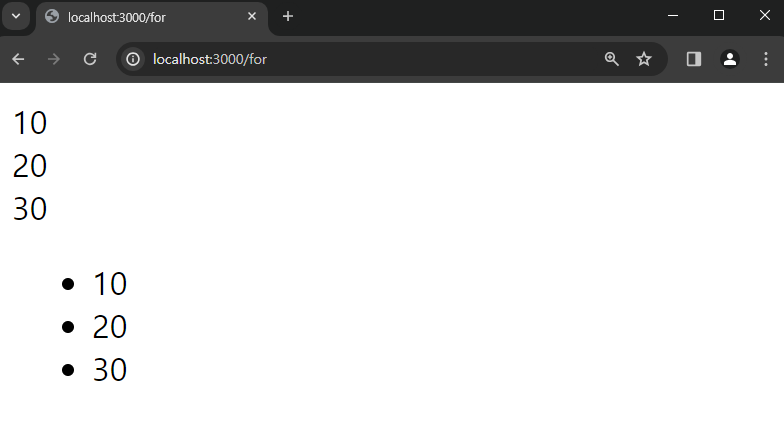
NODE.JS for문
* <% %> 안에 <%= %>를 넣을 수 없다
const express = require("express");
const app = express();

app.set("views", "./views");
app.set("view engine", "ejs");

app.get("/for", (req, res) => {
  const arr = [10, 20, 30];
  for (let i = 0; i < arr.length; i++) {
    console.log(arr[i]);
  }
  console.log("---------");
  arr.forEach((data) => {
    console.log("foreach : " + data);
  });
  res.render("for");
});

app.listen(3000, () => {});
<% const arr = [10, 20, 30];
for(let i = 0; i < arr.length; i++){ %> <%= arr[i]
%><br />
<% } %>
<ul>
<% arr.forEach( (data, index) => { %>
<li><%= data %></li>
<% }) %>
</ul>
실행 결과
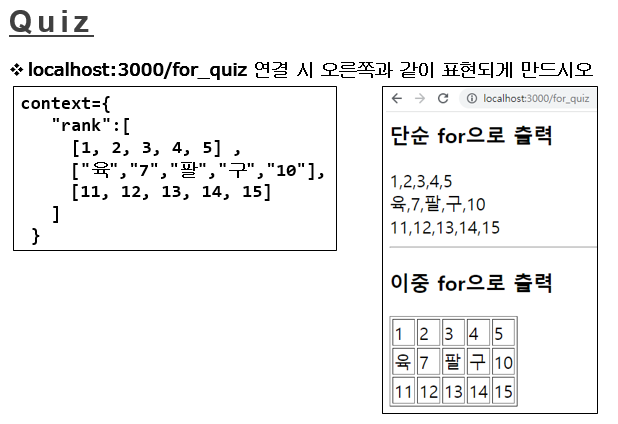
Quiz02
풀이 과정 (1)
const express = require("express");
const app = express();

app.set("views", "./views");
app.set("view engine", "ejs");

app.get("/for_quiz", (req, res) => {
  const context = {
    rank: [
      [1, 2, 3, 4, 5],
      ["육", "7", "팔", "구", "10"],
      [11, 12, 13, 14, 15],
    ],
  };
  res.render("for_quiz", context);
});

app.listen(3000, () => {
    console.log("구동 완료")
});
풀이 과정 (2)
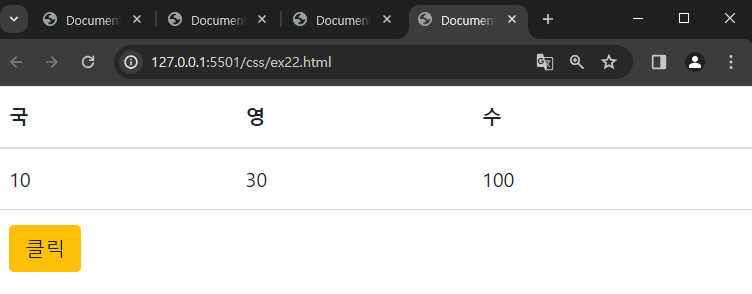
<h3>단순 for으로 출력</h3>
<% for (let i = 0; i < rank.length; i++){ %> <%= rank[i] %> <br />
<% } %>

<hr />

<h3>이중 for으로 출력</h3>
<table border="1">
  <% for (let i = 0; i < rank.length; i++){ %>
  <tr>
    <% for (let j = 0; j < rank[i].length; j++){ %>
    <td><%= rank[i][j] %></td>
    <% } %>
  </tr>
  <% } %>
</table>
실행 결과
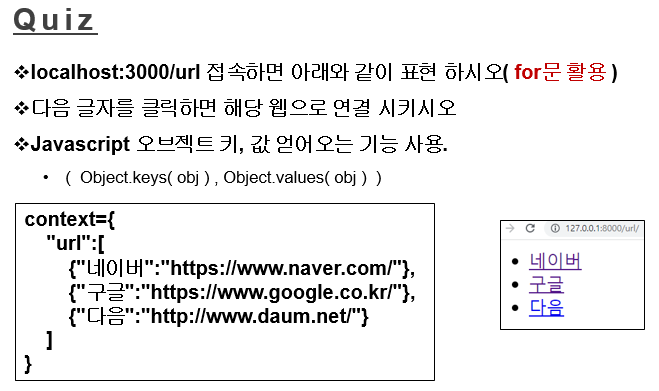
Quiz03
풀이 과정 (1)
const express = require("express");
const app = express();

app.set("views", "./views");
app.set("view engine", "ejs");

app.get("/url", (req, res) => {
  const context = {
    url: [
      { 네이버: "https://www.naver.com/" },
      { 구글: "https://www.google.co.kr/" },
      { 다음: "http://www.daum.net/" },
    ],
  };
  res.render("url", context);
});

app.listen(3000, () => {
  console.log("구동 완료");
});
풀이 과정 (2)
<% for (let i = 0; i < url.length; i++){ %>
<ul>
  <li><a href="<%= Object.values(url[i]) %>"><%= Object.keys(url[i]) %></a></li>
</ul>
<% } %>
실행 결과
'node.js' 카테고리의 다른 글
| NODE.JS 활용 (5) (0) | 2024.04.04 |
|---|---|
| NODE.JS 활용 (4) (0) | 2024.04.02 |
| NODE.JS 활용 (3) (0) | 2024.04.01 |
| NODE.JS 활용 (2) (0) | 2024.04.01 |
| NODE.JS 활용 (0) | 2024.03.29 |